Effortless Excellence: Crafting the Perfect Turkey Gravy from Drippings
Thanksgiving is synonymous with a magnificent roasted turkey, but what truly elevates the holiday feast from delicious to unforgettable is a rich, flavorful turkey gravy. Forget the last-minute panic of realizing you need a quart of gravy for your hungry guests. The secret to an outstanding, stress-free gravy lies not in store-bought mixes or jars, but right in your roasting pan – the golden drippings from your turkey. Crafting homemade turkey gravy from drippings is not only surprisingly easy and cost-effective, but it also delivers an unparalleled depth of flavor that complements every element on your plate. This guide will walk you through transforming simple turkey drippings into a velvety, savory masterpiece, ensuring your holiday meal is nothing short of spectacular.
The Foundation: Crafting Your Flavorful Turkey Stock (and Dry Brining Tips)
The journey to an exceptional turkey gravy often begins before the turkey even hits the oven. A robust, homemade turkey stock provides the backbone for your gravy, imbuing it with authentic turkey flavor. While you can opt for store-bought chicken or turkey broth, making your own from the giblets found inside your turkey adds an extra layer of richness that's truly unmatched.
Why Homemade Stock Matters
Using homemade stock derived from your turkey's giblets gives you complete control over the flavor profile and sodium content. It transforms often-discarded parts into a savory liquid gold, contributing a unique umami depth that packaged broths simply can't replicate. This foundational step is an investment in flavor that pays dividends in your final gravy.
Preparing Your Giblet Stock
To begin, remove the paper bag containing the giblets (typically the neck, heart, and gizzard) from inside your turkey. Important: do not use the liver! While it might seem intuitive, boiled turkey liver can impart an unpleasant bitter taste to your stock. Rinse the remaining giblets thoroughly under cold water and place them in a two-quart saucepan. Pour one quart of good quality chicken broth over the giblets. If you forgot to purchase chicken stock, water will suffice, though the broth will add an extra layer of flavor.
Bring the mixture to a gentle simmer over medium-low heat. Giblets are tough, so they require patience. Let them cook for approximately two hours, or until the meat from the neck pulls off easily. As the stock simmers, keep an eye on the liquid level; if it starts to evaporate too much, add a little more water. Once cooked, let the stock cool slightly, then remove the giblets. At this point, you can chop the neck meat and other giblets finely to add texture to your gravy later, or offer them as a special treat to a very happy pet.
This stock can be made a day ahead, saving you precious time on dinner day. Simply prepare, cool, and refrigerate it until needed.
A Pro Tip: Dry Brining for a Superior Bird
If you're preparing your stock a day in advance, seize the opportunity to dry brine your turkey. After removing the giblets, pat your turkey completely dry with paper towels, both inside and out. Then, salt it generously all over, including the cavity. Place the uncovered turkey in your refrigerator overnight. This simple yet effective technique not only seasons the turkey deeply, leading to a more flavorful bird, but also helps to dry out the skin, resulting in a wonderfully crispy exterior after roasting.
Mastering the Drippings: Extracting Gold from Your Roasting Pan
Once your turkey is beautifully roasted and resting on a platter (a crucial step for juicy meat, allowing it to rest for at least 30 minutes, covered loosely with foil), your attention turns to the treasure left behind in the roasting pan: the drippings. These flavorful remnants are the heart of your homemade gravy.
The Art of the Dripping Collection
Carefully pour all the turkey drippings from the roasting pan into a sieve-lined bowl or a fat separator. The sieve will catch any large bits of turkey skin or aromatics. Allow the drippings to sit for a few minutes, giving the fat a chance to rise to the top. This separation is key. You'll need exactly half a cup of pure turkey fat for your roux. Measure this precisely into a two-quart saucepan. It's critical that there are no non-fat turkey juices mixed in with this half-cup of fat. If you don't have enough turkey fat, supplement it with melted butter to reach the exact half-cup measurement.
Unlocking the "Fond": Flavor's Secret Weapon
With the fat separated, you're left with a roasting pan coated in a dark, sticky, caramelized substance known as "fond." This is pure flavor gold. To capture it, pour about a cup of boiling water (or even better, some of your prepared turkey stock) into the roasting pan. Place the pan over a burner on medium heat and, using a wooden spoon or spatula, stir briskly, scraping up all those delicious brown bits from the bottom. This process, known as deglazing, extracts all the concentrated flavors. Pour this flavorful liquid through your sieve into the bowl containing the remaining drippings (not the half-cup of fat you set aside for the roux). Skim off any additional oil that rises to the surface from this liquid; you want the concentrated flavor without excess greasiness.
The Roux and the Reveal: Bringing Your Turkey Gravy to Life
With your stock ready and your drippings meticulously collected, you're now poised to transform these components into a rich, smooth gravy.
Building the Perfect Roux
Return to the saucepan containing your precisely measured half-cup of turkey fat (or fat and butter). Place it over medium heat. Add half a cup of all-purpose flour to the fat. Immediately begin to whisk continuously. This mixture of fat and flour is called a roux, and it's the magical thickening agent for your gravy. Continue to whisk for several minutes until the roux takes on a beautiful golden-brown color. This process cooks out the raw flour taste and develops a nutty flavor that will enhance your gravy's complexity. A well-cooked roux is crucial for both thickness and flavor.
The Grand Finale: Achieving Silky Smoothness
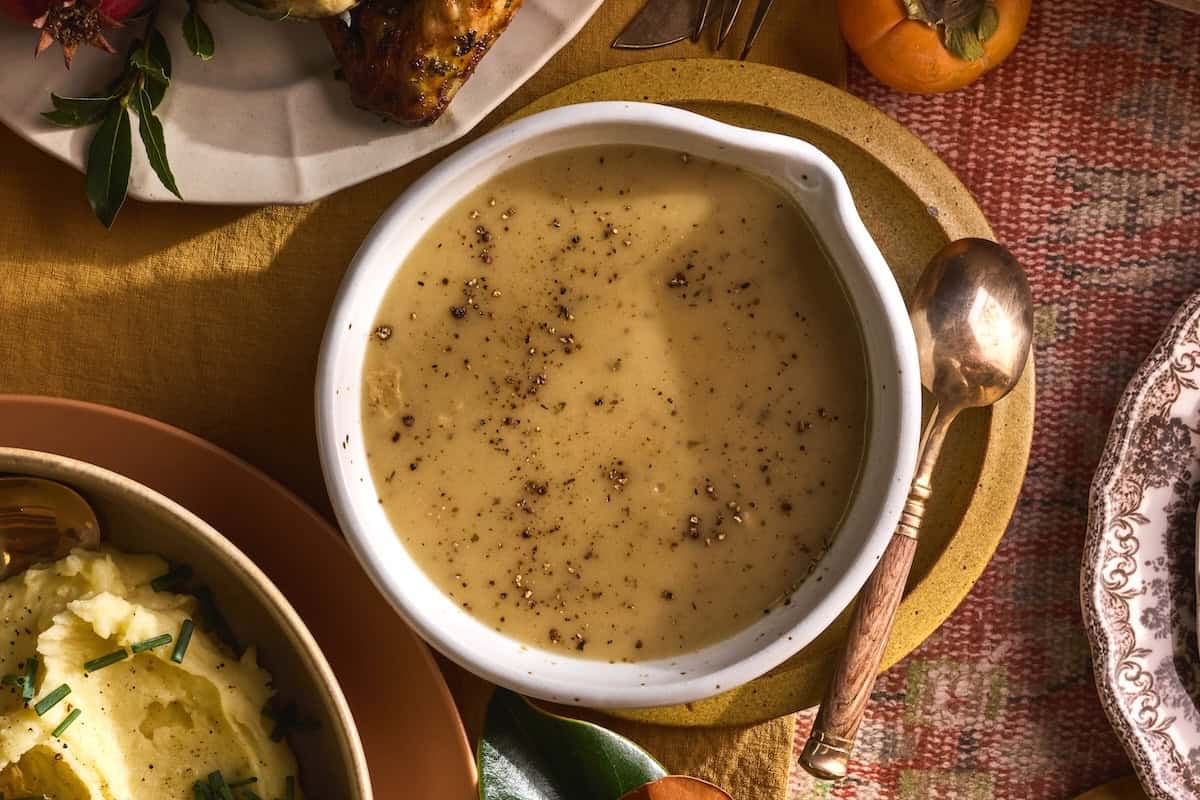
Once your roux is a lovely golden hue, it's time for the big reveal. Slowly, gradually, pour your quart of prepared turkey stock into the roux, whisking constantly to prevent lumps. The mixture will thicken almost immediately. Bring the gravy to a boil, continuing to whisk until it reaches your desired consistency – thick enough to coat a spoon, but still pourable. Now, incorporate as much of the defatted turkey drippings (the deglazed fond and remaining juices) as you wish, tasting as you stir. These drippings add an incredible depth and complexity, truly making it a turkey gravy experience. Season generously with salt and freshly ground black pepper to taste. If you're looking for even more creative ways to perfect your gravy or want to explore variations, you might find additional inspiration in this article on turkey gravy.
Troubleshooting and Serving Suggestions
Even the most seasoned cooks can face gravy glitches. Don't worry, most common issues are easily fixed!
Common Gravy Fixes
- Too Thin: If your gravy isn't thick enough, make a slurry of equal parts cornstarch and cold water (start with 1 tablespoon of each). Whisk it into the simmering gravy a little at a spoonful at a time, allowing it to thicken for a minute before adding more.
- Too Thick: Simply whisk in a little more hot turkey stock, chicken broth, or even hot water until it reaches your preferred consistency.
- Lumpy Gravy: The best defense is a good offense – whisk vigorously when adding liquid to the roux. If lumps appear, you can push the gravy through a fine-mesh sieve, or use an immersion blender to achieve a silky-smooth texture.
- Lack of Flavor: If your gravy tastes a little flat, consider adding a splash of dry sherry or white wine, a dash of Worcestershire sauce, or a pinch of poultry seasoning. A few drops of browning liquid can also enhance its visual appeal.
Beyond the Bird: Creative Uses for Your Gravy
While destined for the holiday bird, your homemade turkey gravy is incredibly versatile. It's magnificent over mashed potatoes, stuffing, and biscuits. Consider using leftovers to create open-faced turkey sandwiches, a savory poutine with fries and cheese curds, or as a rich base for pot pies. Its robust flavor can elevate almost any savory dish.
Making homemade turkey gravy from drippings is a rewarding culinary endeavor that brings unparalleled flavor to your holiday table. By following these steps, you'll not only avoid last-minute stress but also impress your guests with a rich, silky, and utterly delicious gravy that is a testament to the magic of cooking from scratch. Enjoy the process, savor the aroma, and delight in the incredible taste of your own perfectly crafted turkey gravy.
